Developing Film Process
Introduction
Film development is the chemical process that transforms exposed film into visible images. This crucial step bridges the gap between capturing images and viewing them. Understanding the development process gives photographers greater control over their final results and opens up creative possibilities through processing variations.
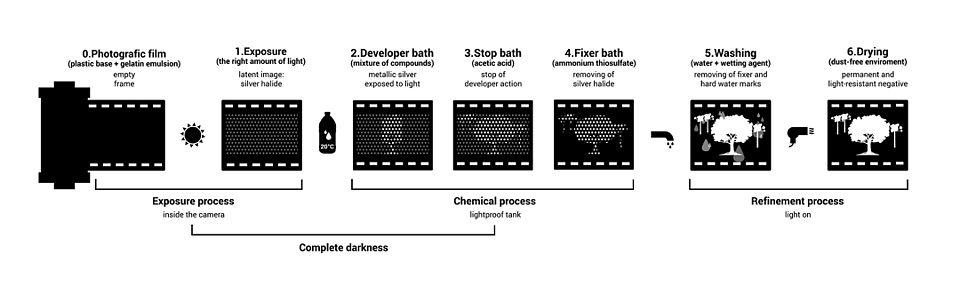
Diagram of the photographic processing workflow. Image: Wikipedia
Key Principles and Terminology
- Developer: Chemical solution that converts exposed silver halide crystals to metallic silver
- Stop Bath: Acidic solution that neutralizes the developer and halts development
- Fixer: Solution that removes unexposed silver halide, making the image permanent
- Washing: Process of removing chemicals from the film
- Agitation: The technique of moving film in the developer to ensure even development
- Temperature Control: Maintaining precise chemical temperatures for consistent results
- Development Time: Duration the film remains in the developer, affecting contrast and density
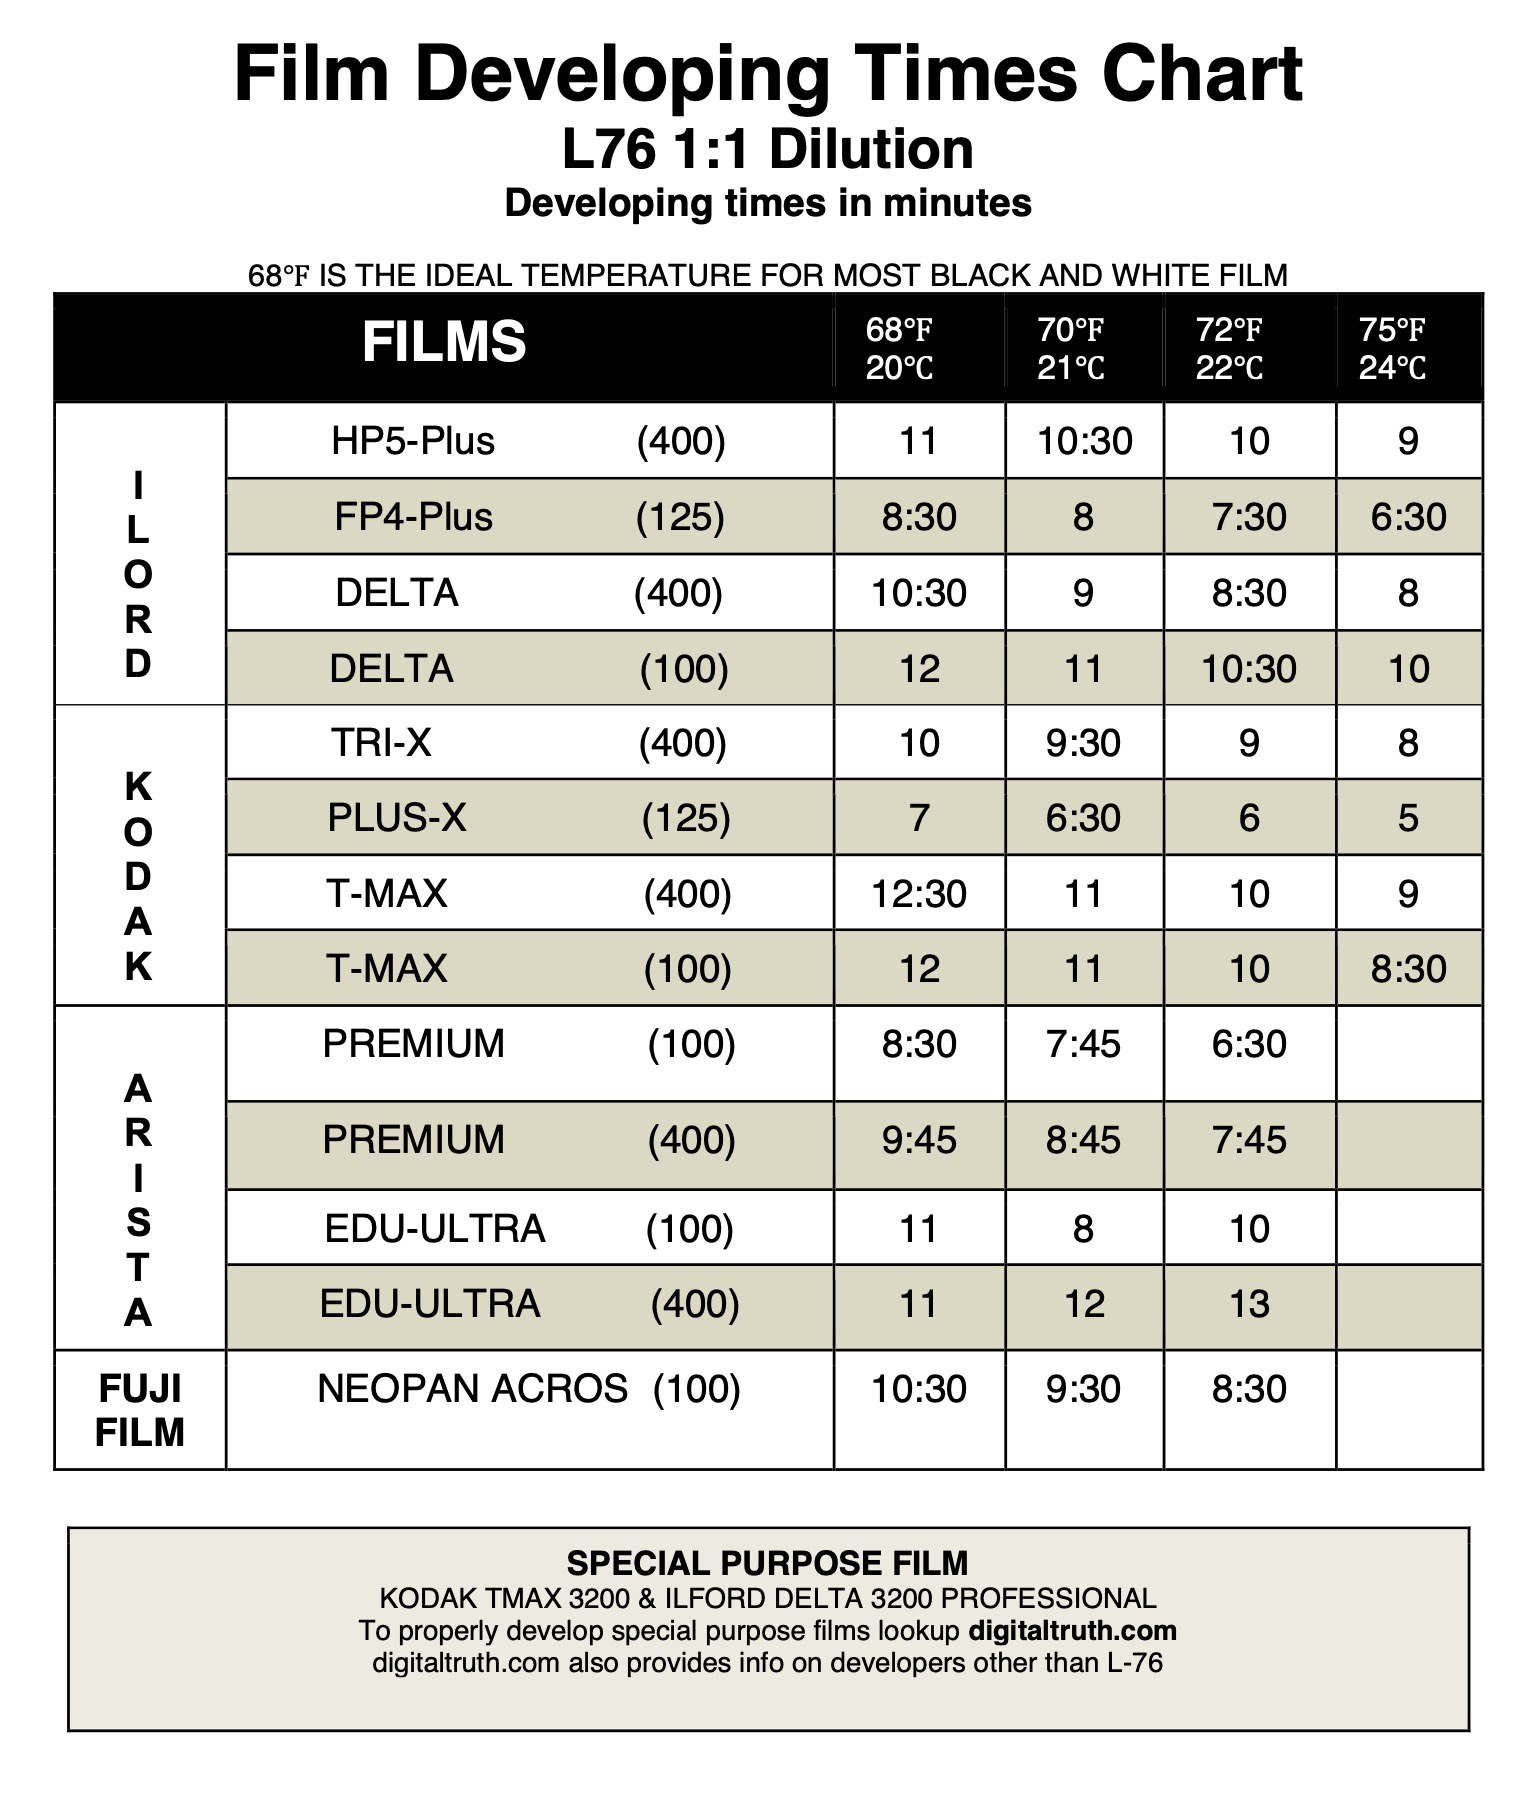
Film developing chart showing processing steps and times. Image: CUNY Pressbooks Network
Equipment Needed
Essential Equipment
- Developing Tank: Light-tight container for processing film
- Film Reels: Holds film in the tank while allowing chemical access
- Changing Bag/Darkroom: Light-proof environment for loading film
- Thermometer: For monitoring chemical temperatures (precision is important)
- Graduated Cylinders: For measuring chemicals
- Timer: For tracking development times
- Storage Bottles: For chemical solutions
- Film Clips/Hangers: For drying processed film
Optional but Useful Equipment
- Funnel: For transferring chemicals
- Stirring Rod: For mixing chemicals
- Chemical Storage Containers: For storing mixed chemicals
- Squeegee or Wetting Agent: For water-spot-free drying
- Dust-Free Drying Cabinet: For clean drying environment
- Development Chart or App: For calculating times based on film/developer combinations
Black and White Film Development
Step-by-Step Process
1. Preparation
- Mix chemicals according to instructions
- Bring developer to correct temperature (typically 68°F/20°C)
- Load film onto reels in complete darkness
- Place reels in developing tank and secure the lid (lights can now be turned on)
2. Development
- Pour developer into tank
- Start timer immediately
- Agitate according to film/developer instructions (typically continuous for first 30 seconds, then 5-10 seconds every minute)
- Maintain consistent temperature
- Develop for recommended time (varies by film and developer combination)
3. Stop Bath
- Pour out developer
- Add stop bath
- Agitate continuously for 30-60 seconds
4. Fixing
- Pour out stop bath
- Add fixer
- Agitate initially for 30 seconds, then periodically (5-10 seconds every minute)
- Fix for recommended time (typically 5-10 minutes)
5. Washing
- Pour out fixer
- Rinse thoroughly with water
- Use hypo clearing agent (optional but recommended)
- Final wash for 5-10 minutes with running water or multiple water changes
6. Drying
- Add wetting agent (optional but recommended to prevent water spots)
- Hang film to dry in dust-free environment
- Allow 2-4 hours for complete drying
Color Film Development (C-41 Process)
Key Differences from B&W Development
- Temperature control is more critical (typically 102°F/39°C)
- Timing is more precise
- More chemical steps involved
- Less forgiving of errors
Development Stages
- Developer: Forms color dyes and develops silver image (3:15 minutes at 102°F/39°C)
- Bleach: Converts developed silver to silver halide (6:30 minutes)
- Fix: Removes silver halide (6:30 minutes)
- Stabilizer: Preserves dyes and prevents fading (1:30 minutes)
- Washing and Drying: Similar to B&W process
Note: Many home developers use combined bleach-fix (blix) solutions to simplify the process. Commercial C-41 kits with detailed instructions are available for home use.
Creative Development Techniques
Push Processing
Extending development time to increase effective ISO. Used when film has been underexposed (shot at a higher ISO than box speed).
- Increases contrast and grain
- Can recover underexposed images
- Development time increases by approximately 15-30% per stop of pushing
Pull Processing
Reducing development time to decrease contrast. Used when film has been overexposed (shot at a lower ISO than box speed).
- Decreases contrast and grain
- Can help manage overly contrasty scenes
- Development time decreases by approximately 15-30% per stop of pulling
Stand Development
Minimal agitation technique where film is left to develop with little or no agitation for extended periods.
- Creates unique tonality and local contrast
- Can help manage difficult exposure situations
- Typically uses dilute developer for 30-60 minutes
Cross-Processing
Developing slide film in C-41 chemicals (or vice versa).
- Creates dramatic color shifts and increased contrast
- Unpredictable results that vary by film type
- Popular for creative and experimental photography
Practical Tips for Beginners
- Start with black and white film (simpler process)
- Practice loading film onto reels with an old film in daylight
- Use a consistent agitation technique
- Keep detailed notes of your process and results
- Consider using a development chart or app to calculate times
- Maintain cleanliness to avoid contamination
- Begin with commercial film developers before experimenting
Common Mistakes to Avoid
- Inconsistent temperature control
- Improper agitation (too vigorous or too gentle)
- Contaminated chemicals
- Insufficient washing
- Dust during drying
- Scratching film during handling
- Using exhausted chemicals
Examples and Case Studies
- Standard Development: Typical process for maximum detail and normal contrast
- Push Processing: Extending development time to increase effective ISO
- Pull Processing: Reducing development time to decrease contrast
- Stand Development: Minimal agitation for unique tonality
- Cross-Processing: Developing slide film in C-41 chemicals for creative color shifts
Ansel Adams' Approach to Development
Ansel Adams considered development an essential creative tool, not just a mechanical process. His Zone System approach integrated exposure and development decisions to achieve his pre-visualized results.
Adams used "N" development for normal contrast scenes, "N+" development (extended time) for low-contrast scenes, and "N-" development (reduced time) for high-contrast scenes. This approach allowed him to control the final print's tonal range regardless of the scene's natural contrast.
He meticulously tested and recorded development times for different film and developer combinations, often developing individual sheets of large format film differently based on the specific scene requirements. This level of control was fundamental to his ability to create his iconic images with their characteristic tonal range.
Continue Learning
Now that you understand the film development process, you might want to explore:
- Film Types - Learn more about different films and how they respond to development
- Nature Photography Techniques - Apply your development knowledge to nature photography
- Test Your Knowledge - Take a quiz on film development
- Practice with Flashcards - Reinforce your learning with flashcards